Submitting a Form With Puppeteer
Created: June 23nd, 2021

In todays article, we are going to be demonstrating how you can be submitting a form with Puppeteer. For those unfamilar with it, Puppeteer is a headless browser which allows you to control an automated version of Chromium or Chrome. Puppeteer is a high-level API used for controlling a Chromium browser through NodeJS using the Chrome devtools protocol. Anything a user does in a browser can be automed using Puppeteer. Because of this it makes Puppeteer a powerful tool for web scraping, PDF generation, automation testing, and much more. In this article, we will be covering exactly how to automate a form submission using Puppeteer.
We will cover:
- Installing Puppeteer
- Automating form submission
- Fetching a website
- Filling out a form
- Uploading a file on a form
Ready? Let's get into it! 🧠
Getting Started With Puppeteer
In order to get started with Puppeteer you'll need to make sure you have NodeJS installed. If you don't we recommend this guide from Guru99. Once you have Node installed we can proceed to create our project and download the Puppeteer library. I highly recommend creating a directory for all your projects in once location. In this case, mine is called javascript_projects inside of this directory create another folder called puppeteer_form_submission. From there you'll want to create a javascript file. By convention we recommend index.js as the main starting point of your application. Once you're done your projects structure should look like the following.
└── javascript_projects
└── puppeteer_form_submission
    └── index.js
You'll want to open a terminal in the puppeteer_form_submission directory and run one of the following commands. For this tutorial I will be using yarn but you can use npm if you prefer.
yarn add puppeteerOnce we have the package installed you're going to edit index.js in your text editor or IDE of choice. We're going to create a simple application to ensure everything is working. Create the following script and run it. If you're uncertain how to run the script we recommend this amazing tutorial from DigitialOcean.
const puppeteer = require('puppeteer')

const main = async () => {
    const browser = await puppeteer.launch({
        headless: false // Show the browser
    })
    const page = await browser.newPage()
    await page.goto('https://www.scrapingbytes.com')
    await page.waitForTimeout(3000) // Wait for 3 seconds
    await browser.close() // Make sure to close the browser window
}

main()
Before we move on it's best that we cover what's happening. In this script we're creating an async function. Inside of the function we are creating an instance of the browser. We are setting the browser to not be headless with headless: false. We do this so we can visually see what is happening in the browser. It's also extremely important that you always close the browser instance. If you don't you will have a browser running the background that will need to be terminated manually through task manager, pkill, etc.
You can now run the script with node index.js. You should then see the browser open, fetch the website, and then close after 3 seconds.
Submitting a Form With Puppeteer
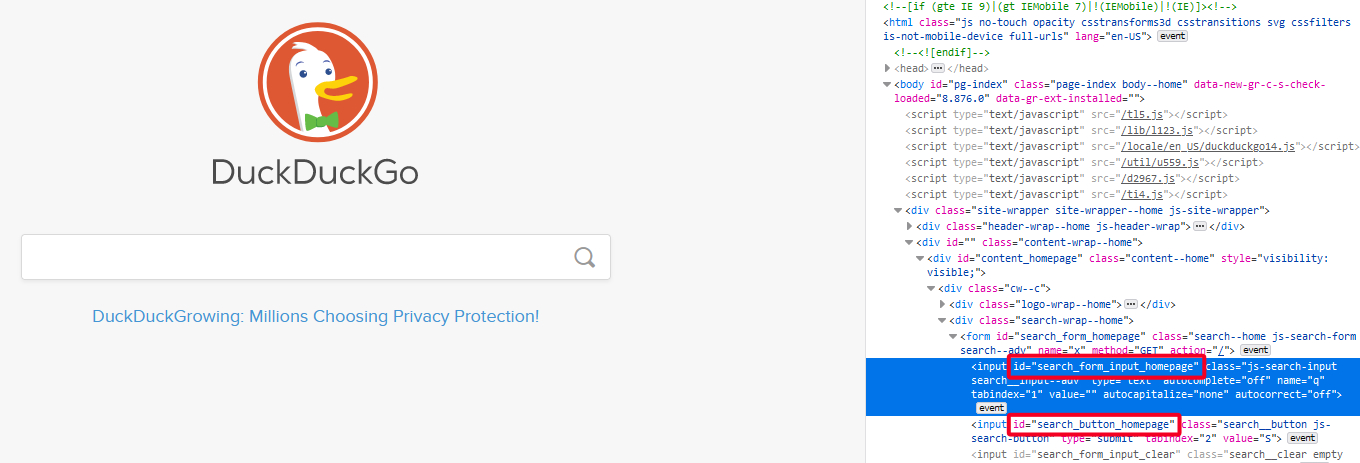
Now that we have confirmed puppeteer is working we can move onto the next step - submitting the form. For our example we are going to use DuckDuckGo and search for our website ScrapingBytes! First and foremost Head over to DuckDuckGo and bring up the Inspect tool for Chrome or FireFox - we prefer to use FireFox but either works.
Using the inspector we can find the ID for both the search input and the search button. Inside form tags you will find two input elements. The search input has an ID of search_form_input_homepage and the submit button has an ID of search_button_homepage. Typically on a form you will find a button with a property of type="submit" - things are a little different here!
Now that was have the information required to fill out and submit the form we can create our script.
const puppeteer = require('puppeteer')

const main = async () => {
    const browser = await puppeteer.launch({
        headless: false // Show the browser
    })
    const page = await browser.newPage()
    await page.goto('https://duckduckgo.com/')
    await page.type('#search_form_input_homepage', 'scrapingbytes')
    await page.click('#search_button_homepage')
    await page.waitForTimeout(3000) // Wait for 3 seconds
    await browser.close() // Make sure to close the browser window. Or you will create additional background processes
}

main()
Let's step through the code and explain what's happening. First we're creating an instance of the browser and fetching the DuckDuckGo homepage. After we load the website we are entering the value scrapingbytes into the search input field with an ID of search_form_input_homepage. We enter the value by using the type function provided by the Puppeteer API. The ID is accessible through the DOM of the browser - we could have selected the input through a class or name. Another way we could have supplied the target input is as follows input[id=search_form_input_homepage] - We can be specific on the target element (by the tag) and supply values such as a name field.
After the value has been entered into the input we click the search button with an ID of search_button_homepage - this will submit the form and trigger the search. After completing the actions the browser will wait three seconds and then close.
Uploading a File with Puppeteer
Next up we're going to demonstrate how to upload a file with Puppeteer. For this example we will be using this form from the MDN Web Docs. If you're having issues we recommend trying an even simpler form on W3Schools.
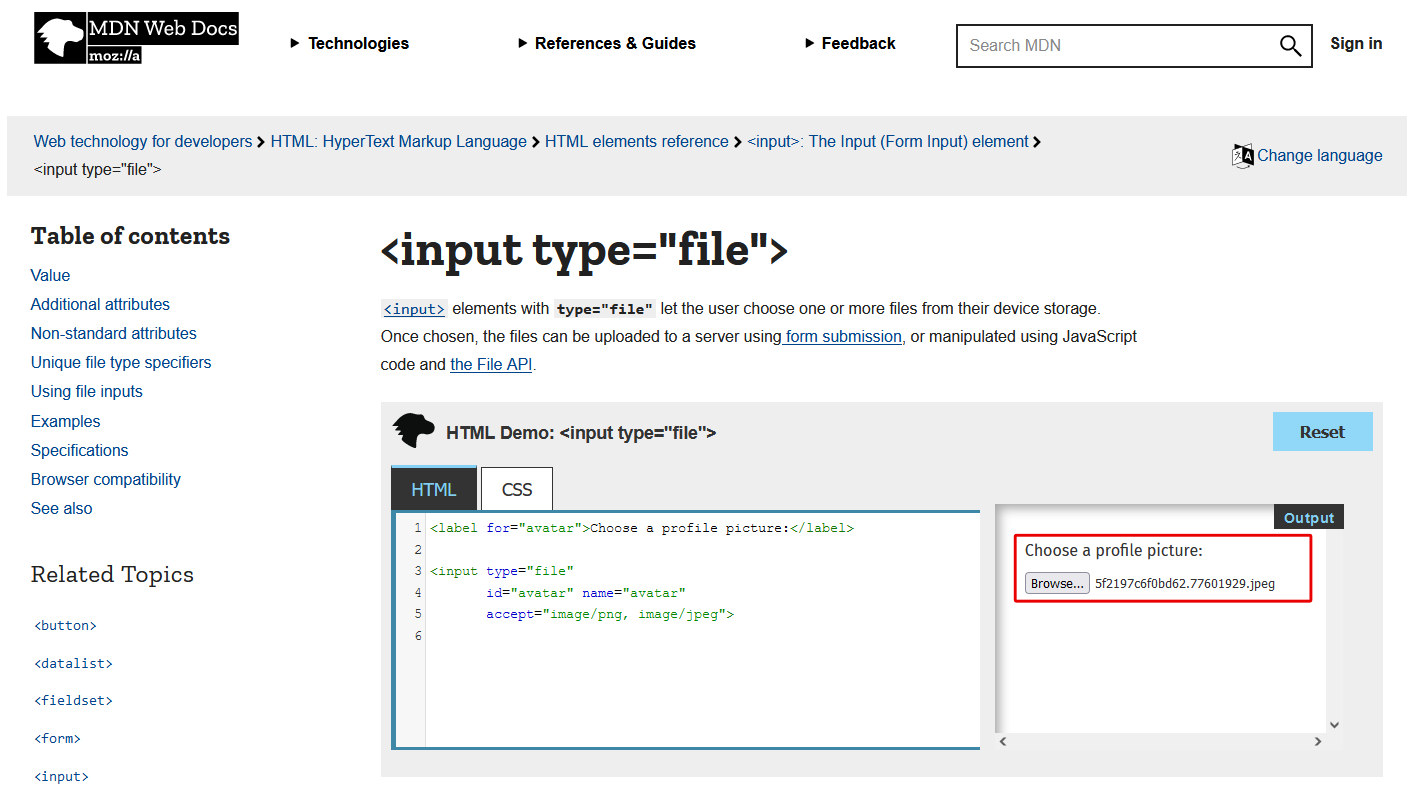
In order to upload a file with Puppeteer we need to return the native DOM element on the page. Thankfully, there is an API to return the element - we can then manipulate this directly in our code.
const puppeteer = require('puppeteer')

const main = async () => {
    const browser = await puppeteer.launch({
        headless: false // Show the browser
    })
    const page = await browser.newPage()
    await page.goto('https://developer.mozilla.org/en-US/docs/Web/HTML/Element/input/file')
    await page.waitForTimeout(3000)
    const element = await page.$('input[type=file]')
    await element.uploadFile('./myfile.png')
    await page.waitForTimeout(3000) // Wait for 3 seconds
    await browser.close() // Make sure to close the browser window. Or you will create additional background processes
}

main()
You might have noticed we are using the page.$ function provide by Puppeteer - this is the magic function to return the DOM element. We then proceed to use the uploadFile function to attach and upload a local file.
To demonstrate another example, we are using W3Schools and finding the input element by ID. We also added a try/catch to log if there was a problem finding the element or uploading the file.
const puppeteer = require('puppeteer')

const main = async () => {
    const browser = await puppeteer.launch({
        headless: false // Show the browser
    })
    const page = await browser.newPage()
    await page.goto('https://www.w3schools.com/howto/howto_html_file_upload_button.asp')
    try {
        const element = await page.$('#myFile')
        await element.uploadFile('./myfile.png')
    } catch (e) {
        console.log(e);
    }
    await page.waitForTimeout(3000) // Wait for 3 seconds
    await browser.close() // Make sure to close the browser window. Or you will create additional background processes
}

main()
Wrapping Up
As you have seen from this tutorial Puppeteer is an extremely powerful tool when used to it's full potential - and so far, we have just scratched the surface. I do highly recommend that you stay tuned on our blog for future content, guides and tutorials. I also hope that this guide gave you all knowledge and guidance you need to start automating with Puppeteer.